


Depending on the type of recording you are going to do, the amount of post-processing expected and your technical knowledge about video recordings, you will have to plan which recording tool(s) to use, any permissions from the people that are going to be in your recording, where you are going to store your recording (video files tend to be very big), and how you are going to publish and share your recordings. You will also need sufficiently powerful hardware at your disposal to process the recording, along with sufficient disk space to store the original recording and any derived output. As always, make sure you keep the original video in case you make a mistake and have to go back (do not overwrite it) and save your derived output often in case the application crashes.
A Guide on Recording Screencasts, Online Training and Events and Live Streaming
By Aleksandra Nenadic, Rachael Ainsworth, Mario Antonioletti, Neil Chue Hong, Simon Hettrick and Graeme Smith.
Planning your recording
Depending on the type of recording you are going to do, the amount of post-processing expected and your technical knowledge about video recordings, you will have to plan which recording tool(s) to use, any permissions from the people that are going to be in your recording, where you are going to store your recording (video files tend to be very big), and how you are going to publish and share your recordings. You will also need sufficiently powerful hardware at your disposal to process the recording, along with sufficient disk space to store the original recording and any derived output. As always, make sure you keep the original video in case you make a mistake and have to go back (do not overwrite it) and save your derived output often in case the application crashes.
Recording types
Here are the most common video/recording types you may have to do:
- Voice-over slide presentation screencasts (with or without an inset video of the speaker). These can be used to, for example, record yourself teaching to create a set of online lectures, record yourself doing a talk/presentation (e.g. for an online event), or an online application video (e.g. for a job or a position such as the SSI Fellowship Programme application or The Carpentries Executive Council application).
- Recording an instructor/lecturer live during an online teaching session (e.g. a Carpentry workshop) or recording a live event such as a conference or a workshop (e.g. the SSI Collaborations Workshop 2020).
- Live streaming.
- Step-by-step instruction videos and how-to guides.
Recording tools & guidance
There are a multitude of video and recording tools available which are suitable for different recording types and jobs - this online guide provides a good overview. Some tools are suited for recording videos only while others are video editors that allow cutting, adding transitions etc. However, most tools these days offer both the recording and a subset of editing functionalities.
Screencasts with voiceover
To make screencasts of your slides with a voice-over and an inset video of yourself, you can use multiplatform, free and open tools such as Open Broadcaster Software (OBS) or OpenShot. If you are using a Mac, you can also use Apple’s iMovie or QuickTime. There are also paid tools such as Adobe Premiere Pro and Camtasia, where you get a number of additional video recording and editing functionalities. mmhmm is a nice tool for making modern looking presentations with the presenter superimposed on the slides. However, this is a commercial product and you will have a watermark if using the free version. mmhmm often offers a small amount of free "presentation minutes" a month, so you could use it for shorter recordings if you can't afford to pay. You can also use Zoom to make screencasts with a voiceover, and with a free account you can record locally to your computer.
The SSI’s Fellowship Programme video application guide gives step-by-step instructions on making screencasts with voice-over using both OBS and Zoom. There is also this guide for pre-recording a lecture using zoom. Here are some general tips:
- Don't talk over slide transitions and try to leave gaps in-between each topic/section. It makes it much easier to edit later, as it's easy to cut out silence but harder to edit in another take if there isn't enough of a gap.
- If you're using an inset video of yourself, make sure you return to a neutral position at each slide transition - again to make editing easier.
- If you mess up a bit, count to 10 and then restart.
- Advancing slides with the arrow keys is often the quietest option (compared to the space bar or a mouse).
- Try and make sure you look at the webcam - it's easy to let your eyes drift towards the centre of the slides.
- If you have glasses, try tilting your head down slightly to reduce glare - this can also be helped by good lighting from the front and dimming your screen.
- If you did a more or less flawless run, you can even use something like Quicktime Player (on Mac) or Photos (on Windows 10) to trim the start and end of the video. Otherwise, you will have to use the video editor of your choice.
- Expect it to take a few hours to record, edit and then add subtitles for a 10-minute talk. If you're inexperienced with video editing software it will take longer.
Online teaching sessions or events
For recording an online teaching session or event, Zoom allows you to record to your computer with a free account or to “the cloud” with a paid one with a push of a button. For more advanced recording options, you may need to record to the cloud and set them in your Zoom Web profile under “Settings” → ”Recording” → ”Cloud Recording” ahead of the session. For example:
- For a fireside chat-style presentation (to record side by side videos of participants), choose the “Record gallery view with shared screen”.
- If you want to use post-processing to merge captured video with slides, you can choose "Record active speaker, gallery view and shared screen separately". Be aware, however, that this may take up a lot of storage space.
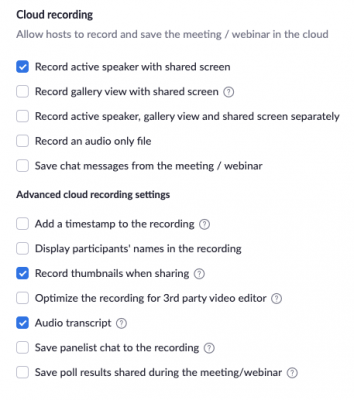 Zoom’s advanced video recording options
Live streaming
You can easily live stream a Zoom meeting/webinar to YouTube Live Zoom (full Zoom documentation here), such as what was done for the SSI Fellows 2021 Launch Webinar. You can also do live streaming using OBS.
To set up a stream via YouTube Live go to YouTube Studio dashboard.
A) To set up live stream event:
- Click the camera in the upper right corner and select “Go live”.
- This will take you to YouTube Studio where you will fill out the information about your live stream event (e.g. title, description, thumbnail).
- Within the control room, you will see Stream Settings with the Stream Keys and URLs.
- The Live Streaming page URL is found by clicking the share arrow button.
- Copy the Stream Key, Stream URL and Live Streaming page URL and paste into the Zoom meeting live stream configuration.
B) To return to a previously set up live stream event:
- Click on the Videos tab in the left-hand sidebar.
- On the Videos page, select the “Live” tab at the top.
- Hover over the live stream and click “View live in the control room” - this will take you to the dashboard for the stream.
To live stream in Zoom:
- Create a new meeting for your event.
- Under the Live Streaming tab, Copy the YouTube Stream Key, Stream URL and Live streaming page URL and paste into the Zoom meeting Custom Live Streaming Service configuration.
On the day of streaming:
- Open any presentation materials and prepare them for presenting.
- Log into your YouTube account and open the control centre for the live stream.
- Log into your Zoom account and start the relevant meeting.
- Double-check that Stream URL and Key match between YouTube and Zoom.
- In another window, open the YouTube Live streaming page URL so that you are able to confirm when it’s streaming.
- In Zoom: click “...More” and then “Live on Custom Live Streaming Service” to connect Zoom to YouTube Live. You can view the stream and check the settings in YouTube Studio.
- When all of the presenters are in the Zoom meeting room and have tested sharing their screens, you are ready to start streaming.
- In Zoom: start recording to save a backup recording of the webinar.
- In YouTube Studio: when ready to start officially streaming on YouTube, click the “Go Live” button in the top right-hand corner of the live stream event control room.
- In Zoom: Deliver the presentation. When finished, click “Stop Recording” and “Stop Streaming”.
- In YouTube Studio: click the “End Livestream” button in the top right corner in YouTube.
- Edit any necessary items on the YouTube Live Stream event dashboard for the video.
Instructional/how-to videos
If you need to record step-by-step instruction videos and how-to guides a good tool to use is Camtasia. This lets you make step-by-step style guides, although it is not free.
Getting consent to record
To record an online session, you will need to get (ideally written) consent from all the people present, in particular if you are planning to make the video recording publicly available on a video sharing platform. You will normally know that you are going to record in advance and you can get the consent as part of your event’s registration process. This may not always be possible (e.g. you do not have a formal registration process or you cannot ask custom questions). You should still let people know your recording plans in advance (e.g. when you are emailing them the event details) and then at the event announce clearly when the recording is about to start to give people enough time to hide their videos and mute themselves, should they wish to do so.
Be aware that Zoom automatically switches the focus to the active speaker when recording so if you need to preserve other people’s privacy you need to use the “spotlight” feature - to force Zoom to record a specific person only. To “spotlight” a person, you need to click the "..." on the person’s image within Zoom and select the "spotlight" option. Note that if you want to switch the person who is being recorded, you have to remember to “spotlight” the new person, otherwise Zoom will continue to only record whoever was on spotlight previously.
To further preserve people’s privacy, you can also uncheck “Display participants’ names in the recording” in Zoom cloud recording options (see the picture above). However, if they speak, people’s audio will still be recorded.
Storing recordings
If you are using Zoom’s cloud recording option - Zoom will store your video files for a month after which they will be deleted so you have to make sure you download and save them somewhere else. You can store your videos anywhere that you have access to and the appropriate amount of space available. In the SSI’s Fellowship Programme video application guide, you will find instructions on hosting your videos on Google Drive or Dropbox and creating links for sharing your videos with others.
Post-processing the recordings
Editing a video and adding a cover
Adding a video cover creates a buffer between opening the video and the start of the talk, and creates a more professional presentation. 5 seconds is a good time for a slide to be displayed on screen. The following software can be used to create video intro slides (and thumbnails) which should be 1920 pixels in width and 1080 pixels in height (and the same art could be reused for other promotion material):
- OpenShot and Inkscape - free and multiplatform
- Canva - has a free plan and presentation templates for YouTube thumbnails and intros.
Here is how you can add the cover to your video using OpenShot:
- Launch OpenShot.
- Check if the settings of the project are correct (via “Edit” → “Preferences” and click on the “Profiles” tab). For good quality 1080p, set the default profile to “HDV 1080 25p 1920 x 1080 (Quality med)”.
- Add the cover and the video files to the 'Project Files' sandbox in the left top corner.
- Add the cover to Track 0 by dragging and dropping the cover from the 'Project Files' into the Track 0 timeline.
- Add the video track to Track 0 by dragging and dropping the video from 'Project Files' into the Track 0 timeline and placing it after the cover.
- If you need to edit your video or remove any sections, you can use the razor tool (scissors icon) to select the cut option. To cut the video, click on the desired position to split the video.
- Remove the part that you don't want by selecting it and pressing the "Delete" key on your keyboard. Move the desired fraction of the video to immediately after the cover.
- Once you are finished adding the cover and editing your video, you can save your changes by clicking on the red dot to "Export Video". It will open the render window.
- Fill in the "File Name" with the name of the file, "Folder Path" with the folder where the files will be stored and select "MP4 (h.264)" for the Target. To render the file click on "Export Video". Each video will take approximately the same amount of time of its duration to be rendered.
Adding subtitles
You can make your video content available to a larger audience by adding captions or subtitles. If you want to reach deaf, hard-of-hearing viewers, non-native speakers or you yourself are not a native speaker - captions and subtitles help them understand your videos better. Most videos on social media are watched without the sound on so it’s a good idea to add subtitles to any video clips you plan to share.
Google has some functionality for adding caption tracks to your video files stored in Google Drive. An alternative is vtt-creator.com, an online editor and visualiser for video captions and subtitles.
YouTube is very good at creating subtitles and doing automatic translations. It makes sense to use it if this is also the platform where you will be publishing your video but you can also use it even if you will be hosting your video elsewhere. Here is how to do it:
- You need to have a YouTube account.
- Once logged in, click on your avatar on the top right and choose “YouTube Studio” in the pull down menu.
- Upload your video (you can have it as unlisted so no one else will be able to find it without the URL).
- In Contents click on the video you are going to add subtitles to.
- Click on the left Subtitle menu item.
- Add a language if you did not already choose one when you uploaded the video. Note by combining languages you can effectively do an automatic translation though it would help to have a native speaker go over it to make sure these are correct.
- Click on “ADD”, you can upload a file, autosync or you can type them in yourself as you go through.
- You can download the subtitles as an .srt file and apply to your video if your final destination point is not YouTube.
Video hosting & publishing
Your recordings can be shared via a video hosting platform such as YouTube or Vimeo. When uploading a video to YouTube, be sure to include the following metadata:
- Title (to match any title used on the video thumbnail and/or cover).
- Description summarising the content and linking to any external resources (such as presentation slides, event webpage, etc.).
- Tags (for example: “Collaborations Workshop” and “Software Sustainability Institute” for videos related to the SSI’s Collaborations Workshop events).
- Visibility (choose public, private or unlisted based on your use case).
- Add to any relevant playlist.
- Select the language used in the video - this is important for captioning and translations.
- Add the licence (for example Creative Commons - Attribution instead of the default YouTube license to enable reuse).
- Select the category (for example Science & Technology).
- Add the recording date.